
by Kyle Olszewski (kolszewski3@mail.gatech.edu)
Renderer Warm-Up Project
CS7490 – Image Synthesis
Professor Greg Turk
Introduction:
The renderer which I used for my project is the radiosity lightmap generator contained in Irredit, a world editor designed to create levels for the Irrlicht game engine. The software for Irredit can be found at http://www.ambiera.com/irredit/, (under the “Downloads” section). Tutorials for the world editor and lightmapper, an FAQ section, and a forum where users discuss features of Irredit are all found on this site as well.
While the Irrlicht game engine is open source, Irredit is not. The software is freely distributed, but
gaining access to the source code requires the purchase of a license for 450
Euros. All of the versions of the software distributed on the website run under
the Windows operating system, though the creators plan to extend the editor to
other platforms in the future.
The Basics:
Though the world editor allows
the user to render scenes using several different types of renderers
(described below), the primary and most powerful renderer
used in this lightmap generator is a radiosity solver which proves realistic effects such as
global illumination and color bleeding for use in textures to be applied to static
objects in a 3D game environment. I did
not have access to the source code, and information online concerning the
specific implementation used in the renderer was
scarce. However, judging from the
information I was able to gather experimenting with Irredit,
the software apparently uses a fairly standard implementation of the radiosity global illumination algorithm, subdividing each
of the objects in the scene into multiple patches and using radiant-energy
transfer equations to determine the effects of each of the lights in the scene
on each patch, performing multiple passes to progressively determine the
overall effect of the light radiating from each of the patches in the scene
onto other patches. The resulting textures portray realistic shadows and the
effects of light bouncing around the scene, reaching areas it may not directly
affect.
Given that this renderer is primarily intended as a lightmap generator for 3D game environments, it is designed
to work with 3D models which are represented as (relatively simple) polygonal
meshes with textures applied to them. The renderer
can import files from a large number of formats, including 3D Studio (.3ds),
Alias Wavefront Maya Objects (.obj),
COLLADA (.xml and .dae), DirectX (.x), and OGRE
(.mesh), among several others. I
attempted to load several Maya files which used non-polygonal surfaces such as splines into the editor, but experienced several errors
which prevented the object file from being loaded. (This of course makes sense, since splines are not typically used in the models used in game
environments.) The editor may also
import existing scenes created in the Irredit format
(.irr files) which consist of polygonal meshes,
lights, skyboxes, terrain maps, and other objects made available in the editor. The renderer may
perform software-based rendering or hardware-accelerated rendering when
possible (using Direct3D 9.0). There is
no shading language made available to the user in Irredit,
but given that the renderer is designed to create
scenes for use with the open-source Irrlicht engine,
it is possible for very dedicated and experienced users to change the manner in
which the scenes they develop are rendered in a game by altering the engine’s
source code.
The Good Stuff:
There are several impressive aspects of this renderer.
One nice feature of the renderer is that, given that
it is used as part of the Irredit world editor, which
has a simple and intuitive graphical user interface, it is easy to
progressively develop the scene while observing the intermediate results.
Rather than defining the scene in a data file and then running the renderer, one may progressively build the scene, adding
models and lights based on the results of previous alterations. In addition,
since the renderer generates lightmaps
which are used as textures on objects in a 3D game environment, after running
the renderer the user is able to view the rendered
scene from any angle simply by moving the camera around within the scene.
(Unfortunately, this also meant that trying to create single images of my
scenes to use on this site was unnecessarily complicated; I had to take a
screenshot while running the editor and then crop out everything but the
viewport.)

An example of the
object translation tool in the GUI used for scene creation in Irredit.
Dragging on the arrows allows the user to translate the objects in the
X, Y, and Z dimensions.
Irredit also allows the user to choose from multiple
rendering techniques when rendering the scene. Once may simply choose to render
the scene using only white ambient light which allows the user to see all of
the objects in the scene, even those outside the range of the lights. The user may also choose to render the scene
with diffuse lighting without shadows, which results in a very quick and
efficient rendering of complex scenes.
There is also an option to render the scene with diffuse lighting with
shadows, which adds a layer of realism to the textures applied to the objects
within the scene (although it requires significantly more time to render).
Finally, the most impressive option (and obviously the one which takes the most
time to render) uses the radiosity solver to apply
global illumination to the scene. These multiple levels of detail are a great
feature which allows the user to pre-visualize the scene being created to make
sure that the scene to be rendered achieves the basic desired effect before
applying the costly radiosity rendering to achieve a
more realistic and impressive look.
Judging from my own experiences observing pictures of scenes on the Irredit site and rendering my own scenes, it appears that
the color bleeding effect of the renderer is best
demonstrated in scenes containing a few relatively simple, colorful objects and
bright lights (i.e., brightly colored objects consisting of a few large flat
sides, such as cubes and boxes); however, even without this effect, the radiosity solver provides impressive realism in complex
scenes by realistically depicting the manner in which light is bounced around
and reaches objects it could not directly reach. The renderer also gives the user a fair
amount of discretion in choosing the parameters with which to render the scene,
such as the shadow opacity, the resolution of the lightmapping
textures to be used, whether to turn on color bleeding, etc.
Though it is not directly related to the world editor, one aspect of Irredit which I found interesting was that it allowed the user to add animated meshes (such as a character repeating a few basic movements, or a cube rotating in air) and particle systems to their scenes. The particle systems seem particularly useful; though they are unaffected by the lightmapper, they are useful for providing “motivation” for the light sources contained in the scenes, such as a flaming torch hanging on a wall, or sparks flying from a forge.
Irredit also possesses a powerful scripting tool which allows users to execute code directly from the script editor. The language used for these scripts is Squirrel, which resembles Java and C++. Though I did not have time to explore its abilities in depth, it seems like an efficient method for automatically performing basic, tedious tasks (such as loading textures, or traversing nodes in the scene graph) when creating a scene, and the online tutorial on the Irredit home page provides a thorough explanation of its capabilities.
The Bad Stuff:
However, the lightmapper in this editor (which was
started by its creator simply as a part-time project) also lacks many features
which would allow it to achieve more impressive results and make it easier to
use. Clearly, this render is intended primarily for rendering fairly
realistically lit textures for 3D game objects, but not more photorealistic
results. I attempted to run the lightmapper using
more complex models containing tens of thousands of
polygons, but I ultimately began receiving error messages, and the application
eventually froze. Since the renderer is primarily designed
to create textures to be applied to static objects in 3D game worlds, it also
lacks the option to use more realistic effects such as refractive or highly
reflective surfaces. The world editor
only allows the user to use point lights, directional lights, and ambient light
in the scene; light sources such as area lights and spotlights are not included
in the renderer at this point.
In addition, the renderer is subject to an obvious flaw in the use of light maps to add realism to a game scene: when a character or object moves between the supposed light source and a lightmapped object while playing the game, the texture will not change, revealing that it is simply “baked” onto the target and not a dynamically created lighting effect. Thus, while lightmapping is a cheap way to add realism to static objects in a scene, it is also subject to problems which make it much less convincing than dynamically generated lighting. As the hardware used for 3D games becomes more powerful and capable of creating realistic lighting and images, clever techniques such as lightmapping seem to be losing their appeal among game developers.
[Note: Lightmapping
was used extensively in the original “Doom” to provide realistic lighting on
the walls, floors, and ceilings. More
recent games, however, tend to make more use of techniques such as shadow
mapping and shadow volumes (the latter of which was used in the sequel “Doom 3”
released in 2004.)]
In addition, though the basic features of the renderer
are easy to use, it seems that exploiting some of the more powerful features
requires significantly more skill and knowledge. While researching features of
the renderer, I noticed several photos which
demonstrated impressive features of the radiosity lightmap generator, such as color bleeding (http://www.ambiera.com/irredit/screenshots.html
- look at the images under “Irredit 0.6”). I attempted to create similar effects in one
of the scenes I created (see below); however, despite the seemingly simple
nature of the scene, I was not able to perfectly replicate the rather
impressive color bleeding results achieved in the photos, even after extensive
effort and a great deal of experimenting with the various parameters of the scene
(light radii, object positions, texture resolution, etc). I searched online for a copy of the world map
used to render these images to compare the differences between these scenes and
mine, but was unable to find them.
Though there are many impressive photos online of the results which may
be achieved with the Irredit lightmapper,
few of the scene files use to render these images are available; other than the
few basic example files packaged with the software, there are very few Irredit scenes readily available on the Internet. Despite searching extensively for information
about how to better make use of the light map generator’s more impressive
features, I was able to find little information to help me.
This brings me to the online documentation for this renderer
on the Irredit home page, which left much to be
desired. There are a few brief tutorials discussing the basic aspects of the
world editor and the lightmap generator, such as
creating lights and moving objects around the scene, but they do not go into
great detail, and provided no information about how to achieve the more complex
effects mentioned above. There is no help feature in the editor itself, other
than a button which opens these simple tutorials in a web browser. Only the online tutorial for the scripting
tool described above seemed to provide a thorough discussion of the features
available in Irredit.
While the online documentation was helpful in gaining an understanding
of the basic tools in this world editor, much of my experience of creating and
rendering my own scenes was simply a process of trial and error.
A nice feature which should have been included with this lightmapper is progressive rendering using the global illumination renderer. The radiosity solver used here performs multiple iterations of the lighting calculations, as described above, and thus could conceivably present the results from each iteration to the user (as in the picture below) as the next iteration is being performed. This would allow the user to prematurely abort a long render if the intermediate results do not achieve the desired effect.
Finally, when observing photos of lightmapped Irredit scenes online and when attempting to render several scenes of my own, I noticed several artifacts such as unrealistically jagged, blocky shadows. Judging from my experiences creating these scenes, it seems that these artifacts are often created when the global illumination renderer is applied to scenes in which objects are placed very close to a light source. This can be seen in the shadows of the pillars used in the demo scene rendered below. This seems to be an artifact of the rendering method used, which subdivides objects in the scene into small patches and determines the lighting effect on each of these patches. Many radiosity renderers seem to suffer from this same basic artifact (see the example images below from http://en.wikipedia.org/wiki/Radiosity). This also happens often when the lightmap texture on the object on which the shadow is being applied has a relatively small resolution. I attempted to resolve this problem by increasing the resolution of the lightmap to be applied to objects, but this only resulted in smaller, sharper jagged edges on the scene. Many of the scenes in the example images on the Irredit home page seem to suffer from the same effects. Without access to the source code, it was difficult to say exactly what caused these artifacts or how to avoid them, but they proved to be a frustrating aspect of the experience of creating and rendering a realistic scene.

Jagged shadows can be seen in the
demonstration of a radiosity renderer’s
progressive execution on Wikipedia.
Example Scene:
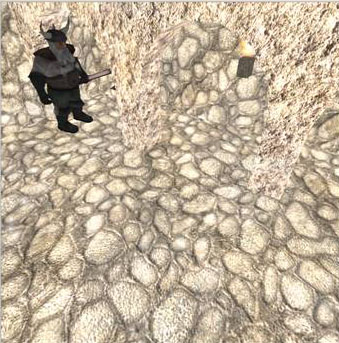
For my example scene, I rendered an example level which was contained with the Irredit software. To demonstrate the various rendering options available in Irredit, I rendered the scene 4 times using the various rendering options available:
White ambient light:
This scene was rendered in ~1 second
Diffuse lighting without shadows:
This scene was rendered in ~1 second
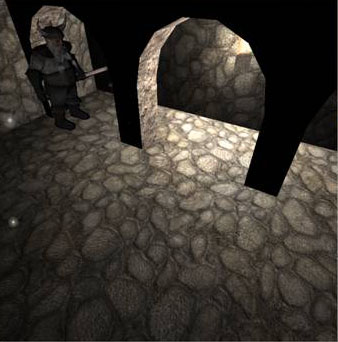
Diffuse lighting with shadows (Notice the jagged shadows):
This scene was rendered in ~2 seconds
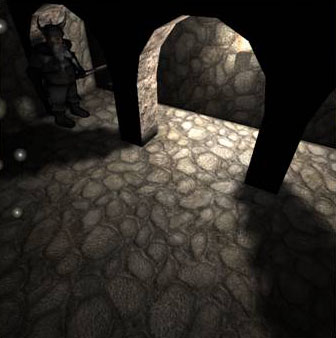
Global illumination:
This scene was rendered in ~37 seconds
Note how the light seems slightly more “blown out” in the final rendering than in the previous one, and the dwarf’s body is slightly more illuminated due to the light bouncing around within the scenes. Also note how the scenes become progressively more realistic looking as more advanced lighting effects are added. (The sparks on the left side of the image are from one of the aforementioned particle systems, which is contained within the scene.)
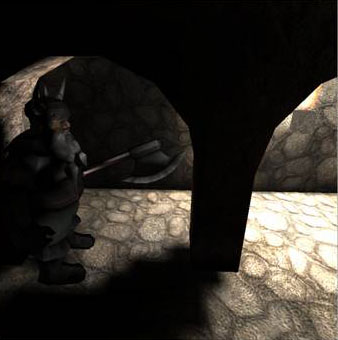
As mentioned before, one advantage of this renderer is that the rendered scene may be viewed from multiple angles. Here’s another view of the same rendered scene (with global illumination):
My Scenes:
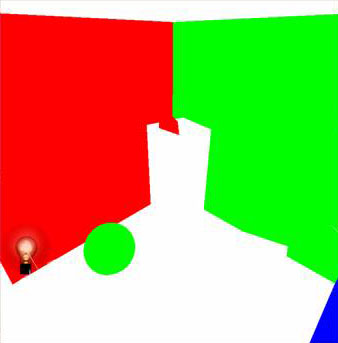
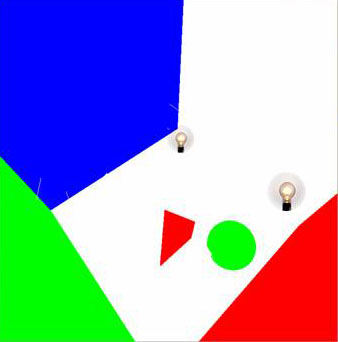
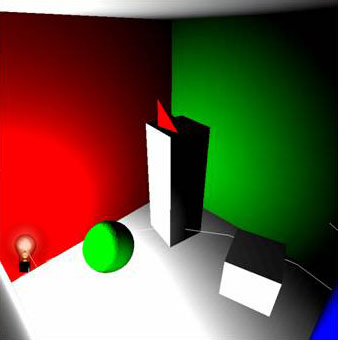
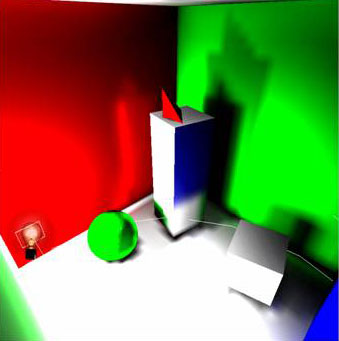
As I mentioned above, the color bleeding effect of this renderer is best demonstrated in relatively simple scenes containing a few basic, brightly colored objects. (In fact, when attempting to combine some of the more primitive and colorful scene objects with more complex ones to observe the color bleeding effect on more complex models, I discovered that the results are very jarring and unrealistic, as the many polygonal facets of the complex models ultimately have very different colors based on their precise angle relative to the bright objects reflecting light onto them.) I wanted to demonstrate this effect in my scene, but also wanted to test the renderer on a more complex and lifelike scene. As a result, I created two scene setups: one, inspired by the “Cornell box” test ( which compares a photo of a real scene to 3D renderings of the scene to judge the renderer’s accuracy; see http://www.graphics.cornell.edu/online/box/ for more information), uses several basic geometric primitives in a 3D “box” with colored walls and bright lights and clearly demonstrates the “color bleeding” effects of Irredit; the other uses more complex, well textured-models in an environment which more accurately reflects a real scene.
Using Google, I first found a few basic objects (spheres, cubes, and tetrahedrons), which then I loaded into Irredit. By scaling, translating, and duplicating the cube (using the “clone” command provided by the renderer) and adjusting the position of these objects, I was able to create a “box.” I created several color patches saved in .png files and applied these as textures to the walls to give them different colors. I then loaded the other primitives into the scene, positioned them in the box, and applied colored textures to them as well. I placed two bright lights on one end of the scene, and then began tweaking the radii of the lights and the positions of the lights and objects, using the simple rendering options described above as “pre-visualization” before applying the global illumination renderer and observing the results.
While constructing the initial scene setup was relatively simple, I was surprised that developing and rendering this scene turned out to be far trickier than the more complex scene I created. Unlike more simple effects such as shadows, it is difficult to predict the final color bleeding which will result based on the scene’s parameters (objects and light colors and positions, light intensities, etc.). Achieving a relatively realistic color bleeding effect thus turned out to be quite difficult, since it involved making tiny adjustments to the lights and objects and re-rendering the scene (which took a fair amount of time using the global illumination renderer), observing the results, and repeating the process until the desired effect is achieved. In addition, the resolution of the color patches I used as textures on these objects turned out to have a large effect on the shape of the shadows and color bleeding effects in the final lightmaps. Smaller textures resulted in shadows which were extremely jagged, or did not precisely reflect the positions of the objects and lights within the scene. Larger textures, while providing more realistic shadows, required more time to load into the scene and resulted in much longer rendering times. Finding the correct balance in the texture resolutions ended up taking a great deal of trial and error.
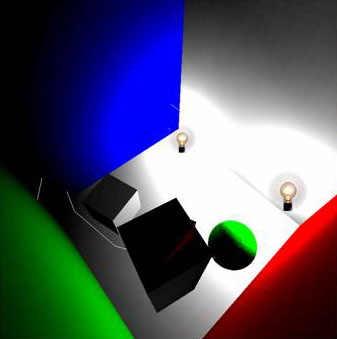
The resulting scene is depicted below. I show images of the scene taken using each of the rendering options from two different angles:
(NOTE: The lightbulbs in this scene are markers contained in the world editor for designating the position of a light source. The circular white lines surrounding them mark the radii of effect of each light. The version of the world editor I was using seemed to have no method to remove these objects if they are visible in the viewport, so I ultimately left them in the scene:)
White
ambient light:
This
scene was rendered in ~1 second
Diffuse
lighting without shadows:
Diffuse
lighting with shadows:
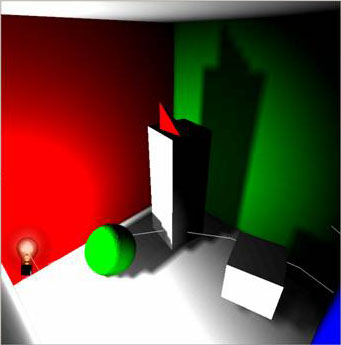
This
scene was rendered in ~2 seconds
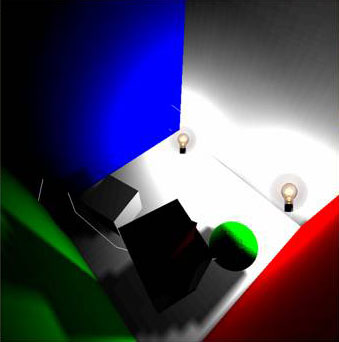
Global
illumination:
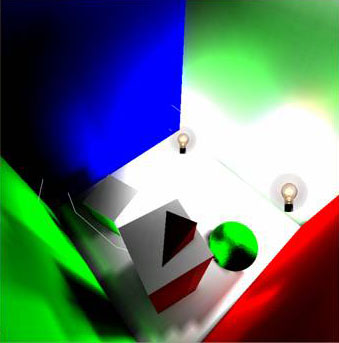
This scene was rendered in ~1 minute, 50 seconds
Clearly, though the shadows in this scene seem to accurately reflect the basic positions of the lights and shapes, the jagged effect described above can clearly be scene. The global illumination and color bleeding effects, however, add some realism to the scene, though the jagged positions of the shadows and color bleeding effects seem to detract from the overall effect.
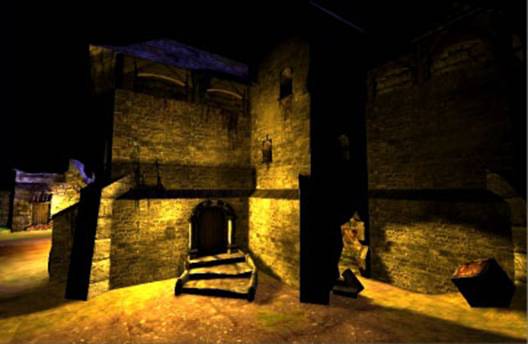
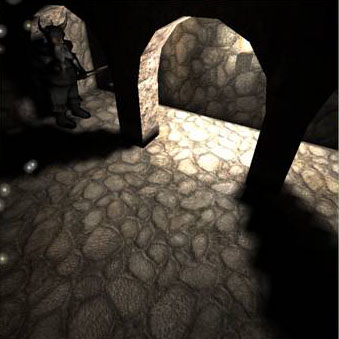
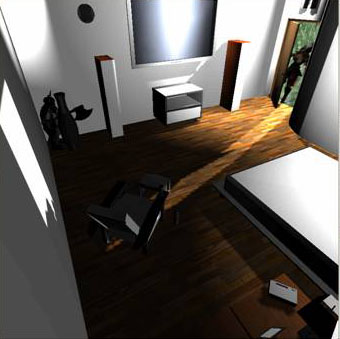
The more complex scene I created is presented below. Though many model formats are accepted by Irredit, it seems that the world editor is more restrictive with the format of the textures applied to these objects. As a result, I loaded many textured models (all free models downloaded from Turboquid) into the renderer, only to find that they were uniformly colored, rather than fully textured as they appeared in the example images online. After much searching, however, I finally found a set of objects which loaded into Irredit with their textures fully applied. (I also reused the dwarf model from the example scene above.) In order to accurately capture the effect of the global illumination in this scene, I searched for a complex 3D environment which could enclose these models, and then carefully positioned them within the environment and added several lights positioned to clearly demonstrate the effects of the renderer in the scene. I placed a terrain map which is available in Irredit on the ground to mask the empty space behind the doorway seen below. (I also applied a skybox available within Irredit in the scene, but it is not visible from the angle portrayed in these images.) Positioning the models within the scene was relatively easy; the hard part was positioning the multiple lights to achieve the desired shadows and radiance throughout the scene. I chose to use lights with radii of various sizes to create very bright portions of the scene next to very dark ones. Because none of the objects are highly reflective or very colorful, I did not have to worry as much about the unpredictable color bleeding effect as in the previous scene (though a slight color bleeding effect is visible in the final rendered image). However, the large number of polygons contained in the scene meant that the rendering time was still fairly long, making it difficult to progressively adjust the effect of the global illumination on the scene.
I call this scene “Surprise Attack:”
White
ambient light:
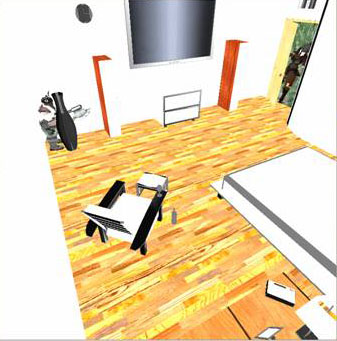
This
scene was rendered in ~1 second
Diffuse
lighting without shadows:
This
scene was rendered in ~2 second
Diffuse
lighting with shadows:
This
scene was rendered in ~45 seconds
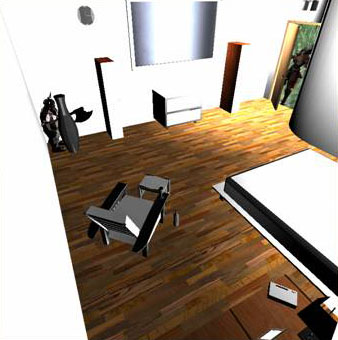
Global
illumination:
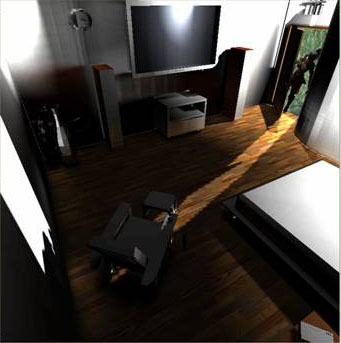
This scene was rendered in 1 hour, 52 minutes, and 40 seconds.
The global illumination image is similar to the image using diffuse light with shadows, but the transition between bright and dark portions of the scene appears slightly more realistic. The shadows are also slightly more jagged, and the some of the dark portions of the scene are now almost completely black (such as the area where the dwarf is hiding). There is also a very slight color bleeding effect seen near the pillar in the upper left hand portion of the screen. Note that this image took much longer to render than any of the others, including the example scene when rendered with global illumination. This is in part because the example scene consisted of a relatively simple environment with detailed texture maps applied to it to give it a sense of realism; the environment used in my scene, however, contains multiple objects containing many polygonal facets, which apparently causes a great increase in the amount of time necessary to render the scene.
Copies of the models, textures and scene files I used in creating these scenes can be found here. (Please read the included text file for specific instructions on how to load these objects into Irredit and render the scenes.)
Conclusion:
For a lightmap generator used in a world editor for
3D games, the renderer used in Irredit
is capable of achieving very impressive results, and gives the user a fair
amount of discretion in determining the look of the world maps being
created. Since global illumination using
the radiosity algorithm is a relatively expensive
technique for dynamically-created lighting, the lightmaps
used in Irredit give the scenes a relatively unique,
realistic and impressive look compared to the scenes in many of the new games
being released today. However, Irredit also clearly lacks some of the more impressive
features and capabilities of a more powerful renderer
which could be used to achieve more realistic and lifelike results using more
complex models and calculations. In addition, the basic features of the renderer are relatively simple to use, but there is a large
learning curve when it comes to learning the many capabilities of the world editor
and the lightmapper, and there is little in the way
of online documentation or example scene files to explain these features to the
user. Thus, achieving the impressive
results portrayed in some of the screenshots on Irredit’s
homepage seems to require a significant amount of time, effort, and practice.
As Irredit
is a project which is constantly being developed and updated, it is possible
that some of these issues will be addressed in future releases. Ultimately, however, despite its flaws, it
has many nice features which make it recommendable to people wishing to gain
basic experience with a radiosity renderer
and seeking to learn how to create realistic and impressive lightmaps
for use in a 3D scene.